Showing posts with label Virginia's View. Show all posts

Sunday, 18 September 2016

Birthdays are good for you....

Had to make a card for hubby's birthday - so thought this sentiment summed it up perfectly.
I coloured the little turtle with markers and framed him with green.  Then made this background with sprays - as you can see I'm not too good with the sprays and got blobs as well -  but that all lent to the effect....I used Magical Micas in green and red. I stamped happy birthday randomly over the background too.  I'm posting my card to Virginia Views #23 challenge - use Spray, Mist or Splatter.  Thanks for taking a peek


Friday, 29 April 2016

Hello Dear Friend


I hate to waste anything - so I have a stash of 'scraps' of card and paper, etc. And then when I'm using ink/paint the same applies...so when I read this months Happy Little Stampers CAS challenge - Stencil Monoprint, I knew I already had a few backgrounds made with using the leftover ink on stencils - I chose this one using the Roses stencil from Kaisercraft. At Shopping Our Stash #249 the challenge is Think Ink, no colouring, so using two die cut flowers and a few scattered sequins over the background worked perfectly.  To finish I'm joining in with Virginia's View April 'Link-up Party' - a card for a Friend, so my sentiment was to die cut 'hello' to expose the base layer and stamped the Dear Friend on a background scrap.  Thanks for taking a peek

Shopping Our Stash #249 - Think Ink


Sunday, 18 October 2015

Watercolour Waterlily

The final card I started on Saturday with the Brushos... I decided to stamp the Inspired by Stamping Waterlily image and emboss it with pearl gold before I coloured it with the Brushos.  To achieve this you first paint the are you are working on (eg the petals) with water and then sprinkle a few grains of Brushos pigment of and watch it spread...I moved the colour about with a water loaded brush...you need to be patient and make sure the painted area is dry before you continue. To finish I 'swam' in some blue to create the watery background.  I am posting to Tuesday Throwdown #266 - Watercolor and to Virginia's View #19 - All Things Coloured.  Thanks for taking a peek

Tuesday Throwdown #266 Watercolor

Saturday, 17 October 2015

Happy 50th


Very recently both my friend Vikki and I celebrated birthdays...me first.  Vikki knew that I just loved the Tim Holtz Crazy Bird stamps and to my utter surprise and joy she gave me the set for my birthday. So then I set about making her a special card using this fabulous set.  I made a 'bendie' card and had a fabulous time colouring them in in bright colours with my favorite Distress Inks, fuzzy cutting them out and then arranging them around the curves...I added a fence, banner and birthday balloons. These cards are not that difficult to make and lay flat so they fit in an envelope.  I am playing along with Virginia's View #19 - All Things Coloured.  Thanks for taking a peek
  .

Saturday, 19 September 2015

Hello

So glad I grabbed a few moments to make a card for the #18 Virginia's View challenge - Geometric Patterns....None of my stamps were very forcoming with such shapes but this embossing folder was just the thing.  I inked up one side before passing it through the cuttlebug and yippee for once the ink took evenly over the white card. I trimmed that down and layered it onto a black to frame it and tie in with the black items on the card.  I stamped the vase on orange card and fussy cut it and die cut the spray (my NBUS element) in black and orange so I could cut off the flowers and adhered them to the stem.  Then I die cut the sentiment in orange and black to give it a shadow effect.  I am posting my card to Darnell's #5 NBUS challenge....who so makes you look at the growing stash and make sure you USE it.  I'm quite pleased with my card as orange is not one of my goto colours.  Thanks for taking a peek
  

Sunday, 16 August 2015

Happy Birthday


When I saw the theme - to use spectacles on your card,  at Shopping Our Stash #214 this week I just had to play with this cute image I stamped up recently while at my friend Vikki's. Some days recently it just feels like I'm galloping along and not getting too far. I used a square card with a window cut in the center and decorated the front with a daisy patterned paper, some die cut daisies with yellow pearl centers; to repeat the theme from the daisy paper  and a simple stamped and layered sentiment.  I positioned the coloured and layered image behind the opening so you couldn't read the fun verse from the outside. I am posting my card to Virginia's View challenge #17  - to use embellishments on your card, and also posting my card to CAS-ual Chic CCC02 - Pretty Patterns.  Thanks for taking a peek

SOS #214: Make A Spectacle of Yourself


Sunday, 19 July 2015

Happy Birthday Tulips


 My mojo has been hiding for a few days  as I've been sorting and packing my craft room for our move and then I spied with a thud that Virginia's View challenge #16 - 100% stamping, was less that 2 hours to close and I was then focused on making a card.... I realized how sometimes with all the latest inks, stamps, papers, card, dies, equipment and all arrays of various medium that it is so easy to overlook how one just started out with stamps and ink (many years ago) and oh wow!!! when embossing powder blew our minds. So I grabbed one of Penny Blacks shadow stamps, applied three shades of pigment ink, and my green embossing marker for the stems, stamped and embossed with clear embossing powder and I had my image. Then I just needed a sentiment (and a birthday card for next) and of course I had to use 'gold' embossing powder for something special.  Then a simple layering onto a purple background and onto my card base.  I'm really happy with this card - I did have a couple of goes with different inks but like these soft colours best.
Thanks for taking a peek

Friday, 19 June 2015

Just Because...

Just where is this month going.... can't believe I nearly missed playing along with
Virginia's View #15 challenge - Ombre/ Monochoromatic
My card combines both techniques...I opted to go with this Lagoon/Minty colour and used my Twinkling H2Os to achieve a gradual blending of the three colours I worked with. I painted two die cut leaf images and a die cut "Friend" foam mounted against the white layers of the card and stamped a simple black sentiment to the side and above my die cut on a full length tab.  Just finished the card with some gems in varying shades.  Thanks for taking a peek


Sunday, 10 May 2015

Just for You


My birthday card today is for two challenges:
Power Poppy - Power and Spark challenge
Virginia's View Challenge #14 - Layers and Dimensions
I made a square card to accommodate this lovely die cut frame which I layered over a square of pink card. Mounted this on three layers of designer paper and card to frame it all again. I stamped and watercoloured the floral image and fussy cut it and mounted it on a matching designer paper with 3D foam tape and onto the frame. Then I re-stamped the image and coloured and cut one flower that I raised over the same image on the posy. Finished off the card with two sentiments and a scattering of tiny pearls. I really like the soft colours and the use of grey which I don't generally use.
http://powerpoppy.blogspot.com/2015/05/ready-for-snip-of-power-spark.html  
Thanks for taking a peek

Monday, 16 March 2015

Happy Birthday


Not sure why I always seem to leave making a card for Virginia's View till the last week, because I really do love to join in this challenge. Virginia has so many fabulously inspiring guests to encourage our creativeness and so many super cardmakers posting their creations, it's wonderful what new ideas/techniques you can gather into your stash of "I'm going to try that".
So here's my card for Challenge #13 - All Things Embossed.
I do remember how blown away I was when I first saw Gold Embossing...WOW, that won me and I've been at it now for many years - we used to use the heat from a toaster to melt the powder as heat guns weren't quite on the market here in Australia....the toasters had gold speckles on them.
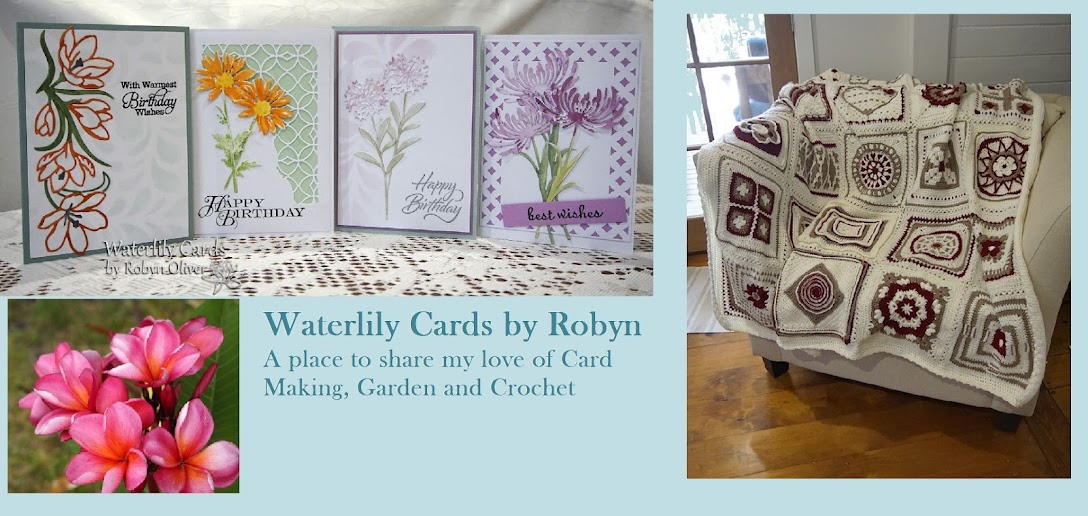
I've made a simple card with pearl gold embossed swirls along one side and sponged over with pale peach chalk ink. Then a swirly stamped and embossed sentiment. No bling just the sparkle and shine from the embossing (which also makes it hard to photograph)
Thanks for taking a peek Robyn
ps - can't believe it's 12 months of challenges for Virginia's View, where did that time go, congrats Virginia and happy 1st blog birthday
 

Wednesday, 11 February 2015

A Bagful of Love and Best Wishes

 This afternoon I have finally completed my card for 
I have made this for our daughters 30th birthday next month and I'm pretty happy with how it turned out.  
From my stash of stamped images I have this 'lolly bag' and immediately thought it would make a great shaker card. I cut the center from the image and used the cellophane packaging from a stamp set to gather up and create the bag so it's not flat. Then I cut a slit above the bow and inserted some more cellophane to create the edge of the bag. I stamped Best Wishes on the pale green backing panel (to run with the idea of a bagful of love and best wishes) and sandwiched the top panels together with some confetti hearts inside. Then I mounted that onto a darker green base and onto a white card. Finished off the card with a computer generated sentiment and tag attached to a ribbon bow.
Thanks for taking a peek Robyn


Sunday, 18 January 2015

Hello best friend


My card for this months Virginia's View Challenge #11.
This is probably one of the "whitest" cards I've made....but I'm loving it.
Virginia asked for a 'clean slate' - lots of white and one layer. I'd been rummaging in my drawer of backgrounds I'd made years ago with my brayer and Kaleidacolour multi colour die inkpads and this one (still lovely and bright) caught my eye. I simply die cut 'hello' and raised it over a slash of black ink (through a stencil I hand cut in paper). Then stamped the sentiment and decided to used to leftovers from the die cut and a black gem to finish the card.
I think there maybe a few more along this line, thanks for taking a peek 
Robyn

Friday, 12 December 2014

Things are always better with Coffee

 I haven't made too many cards recently with other things occupying my time and the pressure is on as we leave Sunday for Christmas with our family...and I still wanted to play along with Virginia's View challenge #10 - All Things Distressed. So after a big tidy up this morning I got the mojo happening and with inspiration also from the Coffee Lovers Bloghop I have made this card.  I've used a Flourishes stamp and water coloured it with my Distress Inks - I love using them as you can dilute them down or use them straight or mix colours to suit and then until they dry you're never sure how they'll come out. I added some Dimensional Magic to the coffee mug and some glitter glue to the steam.  Then I mounted them on colour matching layers of card and designer paper and distressed all the edges, wrapped a few strands of cream wool and used foam tape to lift the image.  Then I used bits of a number of stamps to create the sentiment.  I'm quite happy with the card and pleased I'm making something other than Christmas.
Thanks for taking a peek, Robyn


Saturday, 15 November 2014

Peace

 "ALL Things Metallic" ... well in the end this card ended up as ALL metallic.
It seems I just couldn't get away from an ornament for the Metallic theme and of course I can always do with another Christmas card.  I stamped this Chocolate Baroque bauble in weathered wood distress ink and then water colored it with Twinkling H2Os (metallic lustre). Then to help the snowflake standout more I went over it with silver gelly roll pen. Then I die cut a snowflake in silver paper and it just so happened to match perfectly with the stamped image - spruced it up with so glitter glue and a few blue gems and splattered a few blue water spots over the empty white space.  Then I layered the white card on soft metallic grey and dark navy metallic card stock and onto a white card base. I finished the card with a simple Kaisercraft sentiment and a grey metallic satin bow.  (The top photo is truer to the colour, but a bit dark)....ALL Metallic, and Grey/Silver, Blue and an Ornament for Merry Monday and shiny for Inkspirational.
Thanks for taking a peek Robyn