Sunday 31 December 2017

Happy Birthday


A pleasant afternoon for the last day of the 2017 year, spent at my desk with a little bit of water colouring on a gold embossed image. I used part of the Coffee & Dog Roses stamp (Stamplorations) and fussy cut the flowers I wanted and used DOX to colour them.  Then I used two curvy border dies with my tan mat to emboss the background panel.  I die cut my 'happy' from sparkly gold card and stamped and embossed my 'birthday' sentiment in gold too.... so much gold a bit of a change for me.  I'm liking how my card turned out.  I have used the Stamplorations Sketch and Theme -Stamps and Gold, and am also posting to Stamplorations CAS Card challenge - Anything Goes - colour twist gold and the Never Ending Anything Goes challenge using Stamploration products.  Lastly I'm also joining in with the Simon Says Wednesday challenge - Anything Goes.
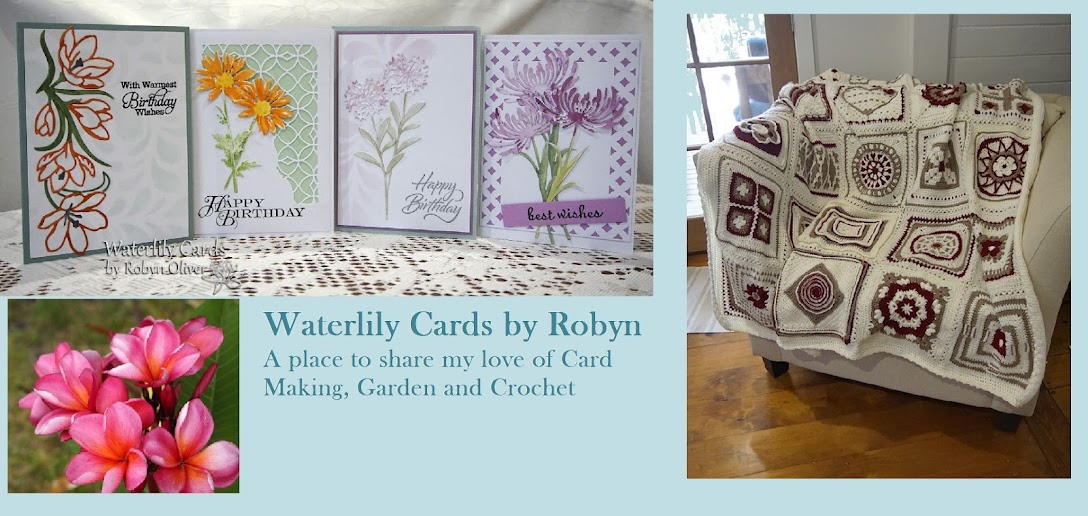
Thanks for taking a peek..... and Happy New Year

  
 wed-newchallenge-header

Simon Says: Anything Goes

Saturday 30 December 2017

50th Birthday Wishes

Today I needed to make a card for a male friends birthday - a special 50th one.  I had no stamp images to suit this person so decided to just go with a large 50 which I traced and handcut from the gold wrapping on Christmas bon-bons we had used and of course I had saved (scrooge me). Then I die cut my sentiment from the same card and punched out some blue glittery dots.  I looks good on the black ground and I used a light brown card.  I am posting to Watercooler Wednesday WWC150 challenge - Masculine Anything Goes.  Thanks for taking a peek

Sunday 24 December 2017

We Wish You a Merry Christmas

My last Christmas card make for the year for a special friend... I love how it turned out.
I made my watercolour background with Distress Oxides & smooching, then a bit more water and dabbing off the excess.  I die cut my ornament twice... in white card which I kept as the outline and the second with double sided tape which I added gold glitter to the cutouts and then repostioned them in the white outline.  I used a die cut tree landscape from my stash to create a snowy scene and then added a die cut holly branch from which to hang my ornament.  I used a deep maroon pink card and to finish stamped and gold heat embossed my sentiment and watercoloured the flower.
I am joining in the challenges at CAS Mix Up December - Anything Goes (stamping, heat embossing, die cuts, watercolouring, glitter), also to CAS Watercolour - Anything Goes, and to Muse; Christmas Visions 90 - Any Holiday Card.  Thanks for taking a peek


Muse: ChristmasVisions

Muse: ChristmasVisions 90

Sunday 17 December 2017

Holiday Treat Bag


Over at Power Poppy's 12 Days of Christmas - on Day 5 Julie has made a Holiday Treat Box ... so I was prompted to join in and have made a Treat Bag.  Using one sheet of double sided Designer Paper this easy fold bag will be handy for some special treats for a friend.  Once folded and glued I added a red folded strip to the top of each side and threaded ribbon to form handles.  I painted a wooden holly tag and added my sentiment - stamped and die cut with a stitched tag die, to hand from my handle. To finish I adhered some velcro to close the top.  I am also posting to Simon Says Wednesday challenge - Stitch It.  Thanks for taking a peek


Simon Says: Stitch It

Tuesday 12 December 2017

'Twas the night before Christmas


I love this PB stamp - Pine and Star, and don't think I've used it this year - so time for something different.  I had this watercolour background using Brushos in my stash and thought it looked like a night sky so I stamped the tree three times - twice in two greens of DOX and final stamp in dark green DI as it wasn't showing on the dark background. Then I used white pigment ink to create the snow bank and embossed it in clear, it didn't show too well either so I used the edge of the ink pad again and used white embossing powder - I like this and added some to the tree.  I stamped on my sentiment in white and embossed it in white, and the same for the star which I moved from the left on the stamp to the center....I added some silvery gel pen to it too.  And finally I spritzed it very lightly with Perfect Pearls for some falling snow and some tiny dots of white gel pen. Thanks for taking a peek


PBSC December - Winter or Christmas

Muse: ChristmasVisions
newchallenge

Monday 11 December 2017

Wishing you a Magical Christmas

My third card as guest designer for House Mouse and Friends challenge has a Christmas Winter theme .... as I write this it is stinking hot and humid here in Queensland, Australia and the thought of snowy fun at Christmas would be wonderful.
I thought these cute 'sledding' mice were having so much fun that they should be sharing it with a few friends.  So I stamped up four images and water coloured them with leftover ink on my plastic sheet. then fussy cut them.  The fifth image I stamped straight onto the middle of my tri-folded card. I added some white glitter to their caps.  Then I sponged in some pale blue sky and used foam to to arrange the images on the snow slope.


Lastly I stamped my sentiments and used a stitched die to cut them out and arranged some green pine foliage from my leftover stash and added some sparkly snowflakes.  It needed a frame so I mounted the panel on red card.  I am also posting my card to Muse: Christmas Visions #90 - Festive Holiday card.   Thanks for taking a peek


Muse: ChristmasVisions

Sunday 10 December 2017

Hummingbird card

Last week I just felt like doing some water colouring and not a Christmas card... so I found this stamped and embossed image in my old stash and used Distress Oxides to paint it.  I just used a lovely matching designer paper and a layer of blue card to frame it.  I like the pretty soft colours and have left off a sentiment so it can be used for any occasion.  I am posting to Watercooler Wednesdays challenge WWC14 - Feminine Anything Goes.  Thanks for taking a peek


Christmas Giftcard Holder


A lovely idea to give a Gift Card to someone who has everything, in a lovely handmade Giftcard Holder..... at Power Poppy 12 Days of Christmas the Bloom Team have us making some useful items for Christmas. On Day 2 Stacey has made a Giftcard Holder which inspired me to have a go.  I used DP for the front and inside card holder section. Then hand cut a shape similar to the paper design on the front around my sentiment... using green and red to add layers...I think it looks a bit like an ornament. Then attached it to some glitter gold tape across the top of the card and attached it with foam tape and a gem.  Inside I used a sentiment tag from a DP pad and mounted it to white card to use as my Gift Card.  I am also posting to Simon Says Wednesday challenge - Gift It and Muse; Christmas Visions #90 - Festive Free for All.   Thanks for taking a peek
wed-newchallenge-header

Simon Says: Gift It

Don't Peek Tag

Today I have used my dies to make a Christmas Gift Tag... sometimes the gap difference between the two nesting dies is too large so I trace around the outside edge of the smaller one and hand cut myself an in-between size. ... that's what I did here to get the light green tag shape.  I used the smaller die to cut around my Santa image which I coloured with DOX and added some white glitter to his hat and cuff.  To finish I stamped my sentiment and fussy cut it leaving a white border and added a two tone ribbon.
I am posting to Addicted to Stamps and More #271 - Anything Goes and to Simon Says Wednesday challenge - Gift It.  Thanks for taking a peek

wed-newchallenge-header

Simon Says: Gift It

Sunday 3 December 2017

Wishing You All the Joys of the Season

A tag/card from me today... for the Muse: Christmas Vision December challenge 90, Festive Free For All - a Holiday card.  I smooched my background panel with Distress Oxides. Then for my tag I dry embossed some white card and trimmed it to a tag. Then die cut my ornament three times... one run with double sided adhesive tape on top and the second in matt silver card and the third with metallic aqua.  After removing the protective layer on the adhesive tape I sprinkle the ornament outline with aqua glitter. Then using double sided tape I replaced the bottom sections in matt silver and the top with metallic aqua. I used metallic aqua gel pen to add some dots to my ornament.
Then I silver embossed my stamped sentiment and outlined it with the aqua gel pen.  To finish I added another tag cut in textured aqua card and tied on some ribbon with silver thread.  Thanks for taking a peek

Muse: ChristmasVisions

Muse: ChristmasVisions 90