Showing posts with label CAS Mix Up. Show all posts

Tuesday, 20 October 2026

Make a Wish... birthday card

A quick post before I head off to our Crochet Group this morning....

I enjoyed the process for the CAS Mix Up October challenge - Blackout Embossing    and finding this other 3D embossing folder in my stash... I just had to see how it would look.

It is also Week 3 of Darnell's IDEAS Prompt - "E" = Embossing Folders

I blended the creamy colour distress oxide ink on white card positioning it approximately where the dandelion would be, then embossed it and used the brayer to apply Salty Ocean DO.  To finish I add a touch of gold gel pen to the seeds and a stamped embossed sentiment.

Thanks for stopping by my blog.... have a wonderful day,   Cheers Robyn

The beginnings of a new blanket I'm crocheting.... Tenacity by Helen Shrimpton


Wednesday, 14 October 2026

....on a roll with four more Christmas Cards
 ....and posting twice in one week... WOW, that's nearly a record for this year.


Then I just had to have a go at the October challenge at 
CAS Mix Up - Blackout Embossing  ... never seen this before and luckily I have a 3D Christmas embossing folder..  

Here's my first effort ... just figured I'd use a scrap to try it out.... but it worked and I ended up covering the cutouts with my stamped gold embossed sentiment label.

This is how it started... I wasn't too careful about painting the recessed areas of the embossing with Twinkling H2Os... which I hoped would give a shiny finish...  and ... once I'd brayered over with Chipped Sapphire Distress Ink...  I was impressed with the technique.

So more had to be made...


This one as you can see I put the textured card in backwards when I embossed it... everything else was the same only I did try to paint the areas more carefully.

and another .. but I used Faded Jeans Distress Ink


and for the last I tried the whole embossing folder and brayered repeatedly to try and get a darker finish (used Chipped Sapphire Distress Ink) - the brayered areas got a bit messier 


....not really into 'dark stuff'  so I was inspired by the ornate decorations on the Christmas tree.


Thanks for stopping by my blog.... have a wonderful day,   Cheers Robyn

Thursday, 10 September 2026

Back from an unplanned break...

Well .... there's a month gone flying by since I last made any cards and posted to my blog... but I must say I am very happy to be back watercolouring at my desk today.....   just a visitor and life getting in the way, oh and yes some crochet and gardening.

Being the first Monday of the month and being inspired by Darnells IDEAS prompt -  "I" = Inks, I got into the inking mode and stamped some holly images using Antique Linen Distress Ink and then watercolouring over the outline with more Distress Inks... the outline of the stamped image takes up the new colour  - so I did well and made two cards and added gold embossed sentiments.


My third card is just inking the stamp with the green DI and then watercolouring, finishing with the gold embossed sentiment.


My next card is for the September challenge over at CAS Christmas - Woodland Critters .... do you know how hard it is the create snowy cards and ones with 'woodland animals'  - here in Australia - not much snow and our wild critters are kangaroos and possums and dingoes... anyway I managed to find a couple of cute animals to make a clean and simple card, more stamped outlines and watercolouring.


The majority of my cards feature flowers... so when CAS Mix Up September challenge wanted Sunflowers I was pretty happy...  
My first card is stenciled with Distress Inks


and my second is a stamp - where I used markers directly onto the stamp but then added more ink to create depth.


Thanks so much for stopping by my blog.... have a wonderful day, cheers Robyn


My daughter loves sunflowers and a few years ago I crocheted her this Sunflower blanket.

This is my latest crochet project 


Friday, 23 September 2022

Best Wishes.....

 Two cards today as we again head towards the end of the month..


First card for the CAS Mix Up challenge ....
  • The stencil is from the cheap craft shop and I used white gesso
  • Then spritzed the card with pink spray made with drawing ink and water and when that was dry I mixed some gold Magical Micas with water and flicked on some extra sparkle
  • Die cut the sentiment (Sizzix - Celebration Words, Script) from gold and pinkish purple card and glued these offset to give a shadow
  • Stamped and gold embossed butterfly (Happy Little Stampers - Especially for You set) and watercoloured with Distress Inks, then attached with foam tape.


Second card for The Flower Challenge.....
  • Inked part of the Penny Black Garden Gems stamp with Distress Inks, lightly spritzed with water and stamped onto white card
  • Stamped and gold embossed sentiment (Kaisercraft - Birthday Wishes set) 
  • Used a rounded corner punch to curve the card panel
  • Attached to pink card to create a frame 
  • To finish I added some white iridescent sequins for the sparkle... love how they catch the pink from the card


Thanks for stopping by my blog --  have a Wonderful Day,   Cheers Robyn

Wednesday, 24 August 2022

Have a Great Day

 Also found some mojo to make this Emboss Resist card for the August CAS Mix Up challenge....


  • Stamped and gold embossed the image from Chocolate Baroque - Fantastic Florals, on white card
  • Blended Distress Inks.. Cracked Pitstachio, Wild Honey and Ripe Persimmon over the embossed image
  • Cut a white card to fit the panel to leave a white border
  • Stamped and white embossed sentiment on a black card strip (from same stamp set) and attached to the card with foam tape

I used stamping, heat embossing, blending/sponging mixed media elements
Thanks for stopping by my blog.... have a Wonderful Day,   Cheers Robyn

Wednesday, 20 July 2022

Enjoy Your Day

 Squeezing in a card while our visitors are off at the shops...


Wings always bring butterflies to mind and we have lovely ones in the tropics
  • Die cut the butterfly twice and watercolour with Distress Inks - blue purple on the under one and more purples on the top,  then spritzed with Mister Huey's Shine mist, and finished with a couple of purple gems.... so old the sticky side doesn't stick, so glue it had to be
  • In my stash found this blue purple shaving cream background with so shine - stamped the sentiment (magazine freebie - Elegant Occasions) and silver embossed, trimmed this panel and  added a border of pearlescent white card
  • Attached to a square white card

Thanks for stopping by my blog....  have a wonderful day,    Cheers Robyn

Wednesday, 22 June 2022

Best Wishes


I recently acquired this cool stencil from Uniquely Creative - Ocean Waves, and just had to try it out
  • Mixed some Distress Ink - mermaid lagoon, with texture paste and applied to white pearl metallic card through the stencil... tried to darken the blue as I came down the stencil
  • Trimmed the panel and layered onto shine blue metallic card
  • Stamped the seahorse in Versamark and silver embossed, then water coloured with Twinkling H2Os and fussy cut it out
  • Die cut some 'sea weed' from a piece of alcohol ink background with die from Sizzix - delicate leaves
  • Stamped the sentiment in Versamark and silver embossed, trimmed and attached all the elements to a blue card and finished with some dots of glitter glue


I am playing along with CAS Mix Up June Stencil challenge - Pastes/gels

Thanks for stopping by my blog,   have a wonderful day,   cheers Robyn

Monday, 21 February 2022

Happy Birthday

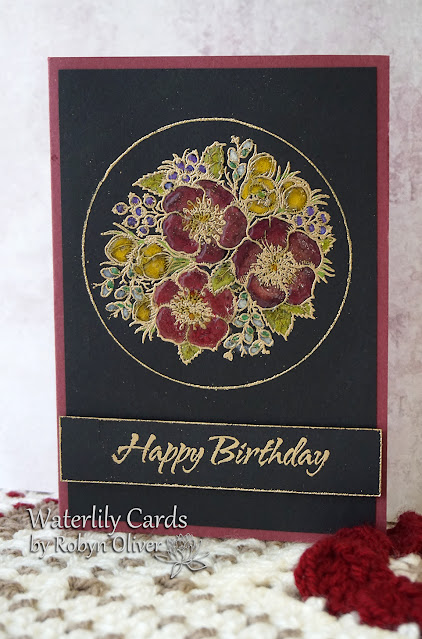
For my first floral card I chose to use black card again as it really shows off the Faux Cloisonné technique 
  • Stamped the flowers from Flourishes: Winter Blossom set, inked with Versamark and heat embossed with gold embossing powder
  • Used Twinkling H2Os to watercolour the Faux Cloisonné and give lots of shine
  • Used a large circle die and gold gel pen to trace a circle round the image and added gold EP and heat embossed it
  • Then remembered I had Papier Glass Finish gloss and painted this onto the dry flowers and let this dry thoroughly --- so shiny now
  • Stamped the sentiment from Darkroom Door: Happy Birthday set, gold embossed, trimmed the black card and gold embossed the edges too
  • Attached the panel to a matching cherry red card and mounted the sentiment strip with foam tape. 

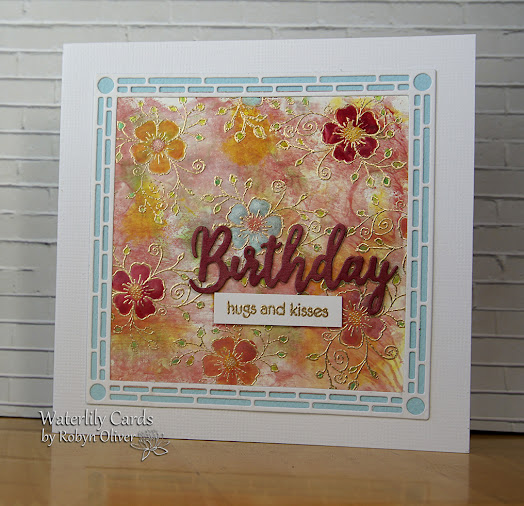
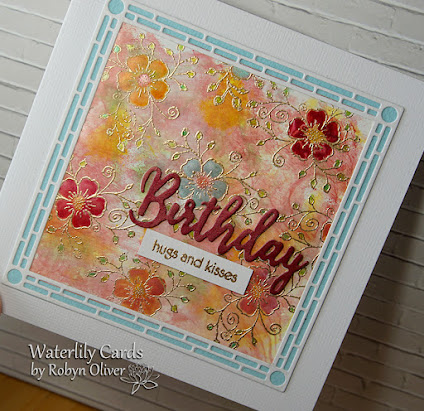
My second card is also using the Faux Cloisonné technique... and as one does sometimes - likes the overall panel and can't bear to cut it up


  • I created the background panel using photographic paper and Distress Oxides - tattered rose, mustard seed, fossilised amber, speckled egg - smooched the colours and then wiped over the panel with damp baby wipe
  • Stamped and gold embossed the small flower stamp randomly over this - Simply Cards & Papercraft: Cottage Garden set
  • Then watercoloured the Faux Cloisonné effect with Twinkling H2Os -   love how this turned out
  • Trimmed the panel to fit inside the die cut frame - from Simply Cards & Papercraft: Stained Glass Noel set .... then trimmed light blue card to fit behind the whole frame and attached to a white square card
  • Die cut the Birthday sentiment from Curly Sue in maroon metallic card, and also again twice in card to layer and give depth to the word when attached to the card
  • Stamped and gold embossed the small sentiment from Altenew: Wishing You set, trimmed the white card and attached with foam tape

I am using my first card to play along with the February CAS Mix Up challenge - Faux Cloisonné   ....  and with my second card I will join the All Occasions challenge at The Flower Challenge #65.
Thanks for stopping by my blog, have a wonderful creative week,     Cheers Robyn

EDIT .....   then moments later I was inspired to use some pieces I had stamped and gold embossed on shiny magazine pages.  The flowers are from Altenew: Focus on You and the jar from Simply Cards & Papercraft: Build a Bouquet.  I added Twinkling H2Os to the flowers and used a gold gel pen and gold EP to add some effect to the jar. 


Saturday, 19 February 2022

Faux Cloisonné Technique using Embossing Folder

 Time to join in the fun at

 CAS Mix Up with a technique challenge....  Faux Cloisonné

and so I've had a think and decided to use an embossing folder and heat embossing to create the gold outline and then 'enamel' the colours using Twinkling H2Os... and I'm very happy with the result.

My sample try out using part of an embossing folder from Simply Cards & Papercraft :  Tranquil Tulips.  I could only get a strip of embossed black card - I very rarely use black, with the gold embossing it looks great and the shiny H2Os painted in really easily creating I think the Faux Cloisonné effect nicely


My first card I used pale gold metallic card to frame the enamel strip and stamped and gold embossed the sentiment from the same Tranquil Tulips set


For the second card I used pale green metallic card as a frame for the enamel strip and stamped and gold embossed a different sentiment from the same Tranquil Tulips set.


I've enjoyed this technique using an embossing folder, heat embossing and watercolours and have played some more... so I'll be back
Thanks for stopping by my blog... have a wonderful weekend,
Cheers Robyn