Friday 26 November 2021

Twofer...die cut Star Christmas cards


Today I'm using this lovely Star die from Australian Simply Cards mag : Fancy Festive Star Nesting set, 
 for my Rudolph Days November challenge... so quick and easy
  • Using an off cut of red card lying on my desk... die cut the star and backed it with glittery silver card.  
  • Stamped and silver embossed the sentiment - Stamp It set 005 and attached to a slim line card

  • Repeated the process with a white card panel and backed with light pink mirror card, then stamped the sentiment with Distress Ink - kitsch flamingo and clear embossing and attached to a white card

Thanks for stopping by my blog,   have a Wonderful Creative day,  Cheers Robyn

Monday 22 November 2021

Christmas Tree Cards

I am a really terrible hoarder of scraps, 
so the challenge at Christmas Kickstart #56 - Christmas Snippets
 is perfect to use up some of them and those not so fabulous Christmas papers I have in my stash


Process in photos below... I used the sentiments from the designer paper packs and added a piece of velcro to hold the tree in shape
They are easy to make after the first one and I quickly put together three


This is the process.. you can get 3 cards from a 12x12 sheet (hint - just make sure the card is squared so the cuts and folds meet up nicely)
Cut 10 x 20cm and  or 4 x 8 inch and score and fold vertical and then diagonals
10 x10cm piece or  4 x 4 in and score and fold diagonal

Use up your scraps.. cut 3 triangles to fit the card
 
Attach the folded square over the centre vertical fold

When folded the card fits into a regular C6 envelope

Hope you might try out this tree card
Have a Wonderful Creative week, and thanks for stopping by my blog,    cheers Robyn

Sunday 21 November 2021

Just for You

 Out with the Embossing Folders and Stencils.... for this months Let's Squash It!! challenge #14

I have borrowed a friends EF.. Couture Creations - Serene..  featuring Butterflies

 
  • I placed the stencil from ARTplorations - Lupinus, over the smooth side of the EF and used Distress Oxide ink to sponge over the stencil... DO - wilted violet, twisted citron, mown lawn
  • ... and sandwiched the white card carefully and ran it through the Cuttlebug
  • All the raised area is left white but then it was had to see with the bright background garden, so I used mini Distress Inks - mustard seed, mermaid lagoon, mown lawn to bring the butterflies and flowers to life
  • I used scrap paper to mask around the raised areas and then also decided to add black Versafine to outline the main butterfly... and going all the way with glitter glue on the wings.
  • Stamped the sentiment (no name) with Versamark on black card and embossed with white.
  • To finish attached to a bright aqua card

Thanks for stopping by my blog... have a Wonderful Creative weekend,  cheers Robyn
AND   What do you think of my little crocheted mouse in his Christmas sweater - first time I've attempted an animal/toy - he's 8 cm or 3inches tall


Thursday 18 November 2021

Trio of Slim line Christmas cards

So So Happy to have all my Overseas Christmas card posted....  Whoopie

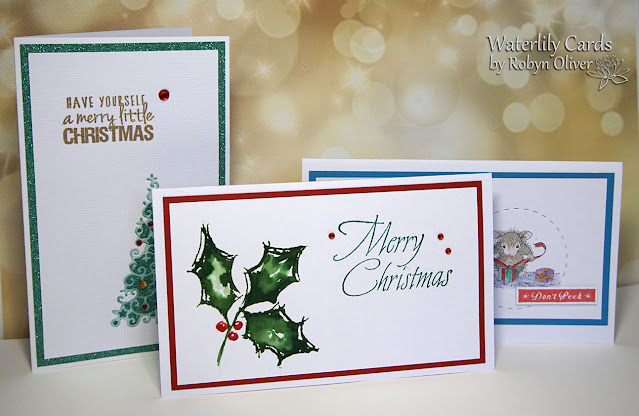
But I still do need a few more for the local family and friends... so today I have 3 mini slim line cards - they measure 3.5" x 6.25" - and the two horizontal ones are from images already stamped and coloured in my stash just waiting for some words... so I trimmed them to size.


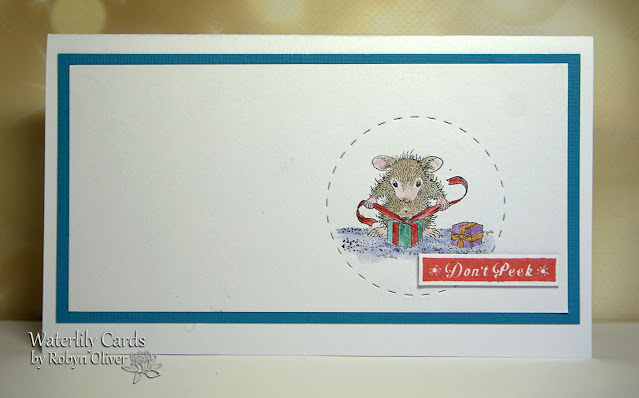
This cute House Mouse - (Monica Mouse) Gifts to Tie,  was stamped with Versafine black and watercoloured with Distress Inks,  then I saw this circle stitched die on my desk and thought to highlight the mouse with it.  Lastly stamped the sentiment with Versafine Clair - Tulip Red, trimmed and attached with foam tape. I added a teal border before attaching to a white card.


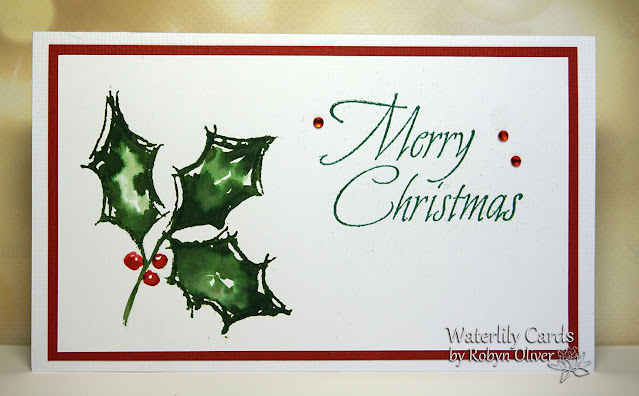
A few months back I was hooked on stamping this Holly Leaf  - Hero Arts: Watercolour Holly Outline, it was stamped with dark green Distress Ink - think it may have been Rustic Wilderness, and then loosely watercoloured with the same - I remember masking the berries and used a red embossing pen to colour the stamp.  I finished the card today - stamped the sentiment from Chocolate Baroque: set 017 with Versamark and used some new Sizzix embossing powder - Mistletoe Green.  Finished the card with a red border and a few red gems

My last vertical card was made using a tree die - magazine freebie, I removed the die cut piece and instead of using it alone, decided to lightly ink with Pine Needles Distress Ink and clear emboss it and then place it back into the panel.  Chose some sparkly green card to place behind the tree and trimmed it to leave a border.  Stamped the sentiment from Kaisercarft - Christmas Quotes and gold embossed.  Assembled the card and added some gems to decorate the tree and an extra for the sentiment.


I am playing along with 
Thanks for stopping by my blog.... have a Wonderful  Creative day...   Cheers Robyn


Saturday 13 November 2021

Tis the Season to be Jolly


  • From my pre-stamped and clear embossed stash I selected this House Mouse and Friends cute stamped image 
  • Used Distress Inks to watercolour it - rustic wilderness, candied apple, brushed corduroy, hickory smoke, fossilised amber, spun sugar
  • Die cut around the image with Poppy Craft stitched die
  • Stamped and white embossed the sentiment - Kaisercraft: Christmas sentiments, onto a red card panel
  • Assembled the elements on a white square card and attached image with foam sheet


I am playing along with CAS Christmas November challenge - Christmas Critters
Thanks for stopping by my blog  --   have a Wonderful Creative weekend,   Cheers Robyn

Thursday 11 November 2021

Merry Christmas Gnome


  • In my stash I had this gnome already coloured and cut... (Papercraft Essentials mag - Enchanted Corner set) but I didn't want a blue hat so I coloured it with an embossing pen and added Sizzix Holly Berry embossing powder.. now it's dark red.
  • I added some swirls of white embossing to his beard too
  • Dry embossed a row of presents on the base of a white card panel --   (from Make Cards Today - North Pole stamp and embossing folder set... adding peacock feathers Distress Oxide to the flat side of the EF before embossing
  • Stamped the sentiment - with black Versafine from Sentimentally Yours : Bauble Opulence collection, and trimmed it to create a mini tag
  • Attached the elements to a white card


I am playing along with AAA Cards CAS Game #202 - sketch with optional gnome twist

Thanks for stopping by my blog   ---  have a Wonderful Creative day,   Cheers Robyn

Merry Christmas


  • In my stash I found this stencil mono print - created using a magazine freebie Pretty Poinsettia stencil and Distress Oxide Inks - festive berries, candied apple, mown lawn - and using the ink left on the stencil lightly spritzed with water and pressed to white card (after I had used to blend colour through the stencil for another background)
  • Die cut the Poinsettia - Sizzix: Layered Christmas Flower - new addition and NBUS
  • Then using Distress Oxides added colours to my work sheet and smooched the pieces - candied apple, barn door, crackling campfire, fossilised amber, twisted citron, mown lawn
  • Used die cuts for the sentiment... Merry in my pre-cut stash (fiends die) and Christmas - from Poppy Crafts - We wish you a Merry Christmas set
  • Assembled the card added glitter glue to the flower centre and shaped the petals


I am playing along with Peace on Earth Christmas challenge #3 - Anything Goes 

and also NBUS challenge #32

Thanks for stopping by my blog  --  have a Wonderful Creative day....   Cheers Robyn


Two "Merry" Embossed cards

 Having some fun today with embossing folders and have two cards using the same EF - from  Couture Creations: Message in a Tree 


This yellow one is created by adding Distress Oxide - wild honey,  to the flat side of the folder and using white card... so the ink creates a background. Simply trimmed to fit a white card to finish


For the blue card I smooched the Versamark pad over the raised areas on the EF - ran it through the Cuttlebug and then added gold embossing powder and heat set  ( not a good photo) ... as you can see I wasn't careful enough with the ink and got it all around the edges - But I do like the effect.  Then blended mermaid lagoon Distress Oxide ink lightly over the embossing and using a baby wipe lightly buffed the gold areas.  Trimmed and attached to a white card
Thanks for stopping by my blog  --  have a Wonderful Creative day    cheers Robyn

Wednesday 10 November 2021

Merry & Bright


  • Stamped with Versamark and Gold embossed the ornament from Chocolate Baroque: Snowflake Flourish
  • Used Distress Inks to blended using a mask - tumbled glass, mermaid lagoon, pickled raspberry, scattered straw
  • Stamped and gold embossed the sentiment - Power Poppy: Poinsettia set
  • To finish - attached to a aqua card with a small aqua gem and gold ribbon


I am playing along with Jingles Belles challenge - Ornamental, My Dear Watson

Thanks for stopping by my blog  --  have a Wonderful Creative day,   cheers Robyn

Monday 8 November 2021

Merry Christmas

well I just love this Poinsettia stamp for Power Poppy 
and instead of watercolouring all the flower in a gorgeous shade I decided to make more of the outer petals into leaves... 


  • Chose to make a slim line card (as there was a white card strip on my desk), so stamped the image randomly around the edge with Versafine - smokey gray.
  • Watercoloured the  images with Distress Inks -  seedless preserves, mown lawn, rustic wilderness, lucky clover, shabby shutters, mustard seed, Distress Oxide - tattered rose
  • Die cut the sentiment from Sarah Davies Signature Collection: Winter Wonderland,  in purple card and using the outline die a layer in vellum
  • Assembled the card with a green card layer to frame and using a peach coloured card


Thanks for stopping by my blog ---  have a Wonderful Creative week,    Cheers Robyn
Sharing some crochet hearts my other passion


Saturday 6 November 2021

Two Shimmer and Shine Christmas cards

In the swing of things this week.... ideas pop into your head when you're delving into your supplies and I've come up with two cards... all shiny too


  • For this card I found some lovely shiny foil patterned paper in my stash 
  • Die cut this bauble from Memory Box: Cabrini Ornament, in white card and watercoloured with Distress Inks - Candied apple, Mown lawn, Fossilised amber.   Then painted over with Magical Micas - Peony scarlet, Bells of Ireland, Yellow rose of Texas to give it some real shimmer.
  • Die cut the sentiment - Memory Box - Sophisticated Snowflakes set, from silver glitter card
  • Assembled the elements on a white card and attached the bauble with foam tape


  • My second card is a shiny star die cut from Australian Simply Cards: Fancy Festive Star Nesting set.  I cut it into white card panel and then die cut the shape with the outline die to make a mask and lightly spritzed with Mister Huey's Shine
  • I cut a piece of gold holographic card to place behind the star and then also the sentiment from Kaisercrafts Christmas Sentiments set.
  • Die cut some tiny stars in pale gold metallic card and also a strip to mount the sentiment on and assembled the card


I am playing along with 
Thanks for stopping by my blog  --  have a Wonderful Creative Weekend,   Cheers Robyn


How gorgeous is my flower cacti... there were 12 flowers this year  😊