Wednesday 27 October 2021

You Are My Sunshine

Don't you just love sunflowers.... they make me smile

And Sunflowers is the theme at Double 'D' Challenge  

  • From my stash of white card I picked a long piece ready cut for a slim line card... so that decided by style
  • Stamped the Hero Arts - Sunflower, randomly over the card with Versafine Smokey Grey
  • Then enjoyed some time while I watercoloured using Distress Inks - mustard seed, fossilised amber, carved pumpkin, Brushed corduroy, gathered twigs  and  used bundled sage for a light background wash
  • Ran the panel edge over a black ink pad which helps define the piece against a white card and attached it with double sided tape
  • To finish I die cut the sentiment from CUTplorations, in white and black and then two more times and glued them together to give dimension..... with the white one I first watercoloured with DI mustard seed and fossilised amber and ran red marker around the cut edge


Thanks for stopping by my blog,  have a Wonderful Creative day,   cheers  Robyn
And here is Watson.... he always likes to come sit on my knee while I'm at my desk... a bit of attention is all he needs and then he's off


Sparkle

 Oh yes!!!  the Christmas cards are rolling off my desk this week - well one at a time and I really enjoyed making this one for the Let's Squash It!  challenge #13 - Double Emboss.


  • Inked the Christmas EF on the raised side with Versamark
  • and off through the Cuttlebug
  • Sprinkled on the Gold embossing powder and then carefully removed most of the unwanted powder with fine paint brush.... and as you can see it got everywhere, but I really like the finished effect ....  heated it then of course and the embossing is in the impressed areas
  • Watercoloured the ornaments with Distress Inks - wilted violet, candied apple, lucky clover, blueprint sketch, mustard seed, carved pumpkin, twisted citron
  • Trimmed and attached to a red card
  • and finished with a die cut "Sparkle" sentiment in shine gold card... (cut this die from a friends stash)


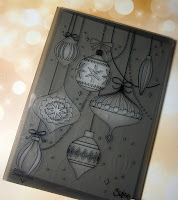
This is the  Sizzix 3D embossing folder I used.. Retro Ornaments


Thanks for stopping by my blog -  have a Wonderful Creative day,
Cheers Robyn


A Mermaid Market bag I finished recently
And a view of my night garden... thanks to the lovely garden lights I received for my birthday, looks much nicer in real life

Tuesday 26 October 2021

Merry Christmas

 Hello cardmaking friends and thanks for stopping by my blog ....

Back again with another Christmas card for the Rudolph Days October challenge


A nice quick and simple card ...
  • Stamped the Holly sprig from Kaisercraft - Tis the Season set, with Peeled Paint Distress Ink, then watercoloured loosely with DI... shabby shutters, peeled paint, candied apple and for the light background stormy sky
  • Stamped and gold embossed the sentiment from Chocolate Baroque - Merry Christmas Script
  • Trimmed the panel and added a bright red card layer and attached to a white card

Have a Wonderful Creative week ....   Cheers   Robyn


Saturday 23 October 2021

Sending You Christmas Wishes


A bit of a browse through my Christmas stamps and I came across this letterbox which of course is Red, just perfect for the CAS Christmas Card October challenge - Red and Grey
  • Stamped the letterbox - a Papercrafter Mag freebie, with Archival Brilliance -Rocket Red and clear embossed it... then fussy cut it out
  • Using Distress Ink - Hickory Smoke and a snowy slope mask, lightly blended a skyline
  • Using a mini tree stamp from Winter Wonderlandand, and Versafine Sokey Grey, stamped a few trees on the horizon
  • Stamped the sentiment from Clear Impressions Christmas Florals with Versamark and silver embossed it.
  • Attached card front to a grey card and used foam tape to mount the letterbox


Thanks for stopping by my blog -   have a Wonderful Creative Weekend,   cheers Robyn

Sunday 17 October 2021

Merry Christmas

 Back with another Christmas card today....

I'm really happy with how this one turned out and know that my Mum will love it too.


  • Stamped this Christmas floral from the Power Poppy Poinsettia set, with black Versafine ink.
  • Watercoloured the image with Distress Inks... Ripe Persimmon, Fired Brick, Shabby Shutters, Mown Lawn, Rustic Wilderness, Fossilised Amber, Dusty Concord, Seedless Preserves
  • ...and for the background Distress Oxide - Speckled Egg
  • Stamped the sentiment from Cardmaking & Papercraft - All Seasons Wreath, with Versamark and embossed with gold
  • Assembled the card with a purple card layer to frame the panel


I am playing along with Christmas Kickstart Challenge #55 - Make One for a Loved One
Thanks for stopping by my blog  ---   have a Wonderful Weekend, cheers Robyn


Saturday 16 October 2021

Best Wishes

 I had fun last week using leaves as stamps to print images on my cards, so I'm back with another...


  • Using three different size leaves from the same plant I, pressed them onto my Distress Oxide ink pad - Crushed Olive and used my hand to press them onto the card panel
  • I let it dry a bit before  I didn't added some silver embossing powder and heat set it.
  • I lightly sponged the same ink around the edge and attached to a white card with matching green layer for a border
  • To finish I die cut the sentiment - CUTplorations - Everyday Sentiments, in shiny silver card and also a small leaf - Sizzix - Small Tattered Florals and attached them to a card strip with the edge sponged too


I am playing along with CAS Mix Up October challenge - Botanical Prints .... leaf stamping, heat embossing, die cuts
Thanks for stopping by my blog -   have a Wonderful Creative weekend,   cheers Robyn


Wednesday 13 October 2021

Any Occasion Card

 The theme at Double 'D' challenge is Owls or Pumpkins.... very Halloween.... but as we don't really celebrate this event in a big way in Australia...
I decided to use one of my favourite stamps...Santa Rosa - Pigmy Owl  ...   isn't he gorgeous


  • Stamped the owl with Versafine Vintage Sepia which helps a lot with the colouring
  • Then watercoloured with Distress Oxide inks - Vintage Photo, Fossilised Amber, Speckled Egg
  • Trimmed the panel to fit a matching blue/green card - first I ran the edge of the panel over the brown ink pad


Thanks for visiting,  have a Wonderful Creative day
Cheers Robyn


Blog Update

As you can see I've been updating my Blog - to share my other Obsessions... 

of course you all know I love flowers and my Garden

but over the past 2 years Crochet has come back into my life in a big way...

So much that I started a Facebook site for those in my home town and now we are a friendly group of 130+ which gladdens my heart - to see that some of the crafts are still alive and enjoyed by young ones, males and females as well as us older gals.  Some of us meet weekly and on the fb site lots share their wonderful works of craft...

Here's a few I've made lately


Afghan squares as part of a year long project - now only 4 to go and then to join them for a rug


Ryan (son, middle) and his friend and friends dad covering up on the odd occasion it gets a bit cool here


A soft rug in a shell design... love these colours


Mandala's - which are fun and colourful to make


Market bag made with leftover Granny Squares

Garden.. some more beds were tidied, top soil added and mulched this week 
And flowering we have the waterfall orchid, and red Hippeastrums (lilies)


Hope you don't mind seeing another side of me
Take care and hope all is well for you
Have a Wonderful Week
Cheers Robyn

Thursday 7 October 2021

Merry Christmas


For the October CAS Christmas Card challenge I have watercoloured my own little snowman using Smokey Grey and Candied Apple Distress Ink.  Then die cut the panel with CUTplorations Crazy Running Double Stitched Rectangle die.  Then stamped the Sentiment from Clear Impressions Classic Christmas in Archival Brilliance Rocket Red and clear embossed onto the bottom of a white card and then  attached the image panel with foam sheet.
I am also joining in the challenge at Watercooler Wednesday  WWC326 - Helen's All About Occasions. Thanks for stopping by my blog,  have a Wonderful Creative day,     cheers  Robyn
  

Tuesday 5 October 2021

To Cheer You


A fun and quick way to make a card is to use a stencil ...
  • On a white card panel I held down my Simon Says Tumbling Leaves Stencil with washi tape.
  • Used more washi tape to mask off the areas I didn't want to colour purple 
  • Using a blending brush and Distress inks - Shaded Lilac and Wilted Violet - softly blended from light to dark the to of the design
  • Then repeated the masking before blending DI Bundled Sage for the bottom
  • Finished the card with a sentiment stamped in DI Wilted Violet and some old Turquoise Sparkle Embossing Powder and attached to a dark purple card


Thanks for stopping by my blog... have a Wonderful Creative Day... cheers


With Love this Christmas


Diane and Darlene from Double D challenge have started a new challenge to help add to our cards stash for Christmas... Peace on Earth Christmas Challenge #1... Anything Goes or be inspired by the picture board (below).... I was inspired by the stocking with the reindeer in white on a grey background

  • I stamped and white embossed the reindeer and sleigh (Paper Crafter magazine freebie) then blended Weathered Wood Distress Ink over the top
  • From a Designer Paper set - Kaisercraft Frosted,  I cut a strip of matching snowflake paper and also found the sentiment tab
A simple card to make and as always love to added to my Christmas card stash
Thanks for stopping by my blog... have a Wonderful Creative day, cheer


Monday 4 October 2021

Happy Birthday


Lots of foliage to choose from in my garden but I was drawn to the ferns..
  • Inked my two fronds using a brayer and Peacock Feathers Distress Oxide and used my hand to press the impression onto my card.
  • When it was partially dry I added some gold embossing powder to heat emboss parts of the leaves
  • Trimmed the panel and die cut a stitched frame using the Poppy Crafts Stitched Flag Tails die - turning the die half way to leave off the tail.  And attached the printed panel to the frame with strips of foam sheet
  • Stamped and gold embossed the sentiment with Happy Little Stampers Fun Birthday Sentiments then attached the framed Botanical print


On a roll I made a second card using different fern fronds
  • Inked the frond with Wilted Violet Distress Ink and repeated the above process to gold emboss parts of the print
  • Stamped and gold embossed the sentiment from Hero Arts - Petite Birthday
  • Trimmed the panel and layered with a matching purple border
  • Lasted attached the sentiment with foam tape


I'm joining in the CAS Mix UP October challenge - Botanical Prints and I have also used stamping and heat embossing and also die cuts on the first card.
Thanks for stopping by blog... have a wonderful creative day,  cheers