Wednesday, 15 January 2020

Cool Colours Watercolouring


Mid month reminder to join in and play along with 
hosted by Bonnie with the theme
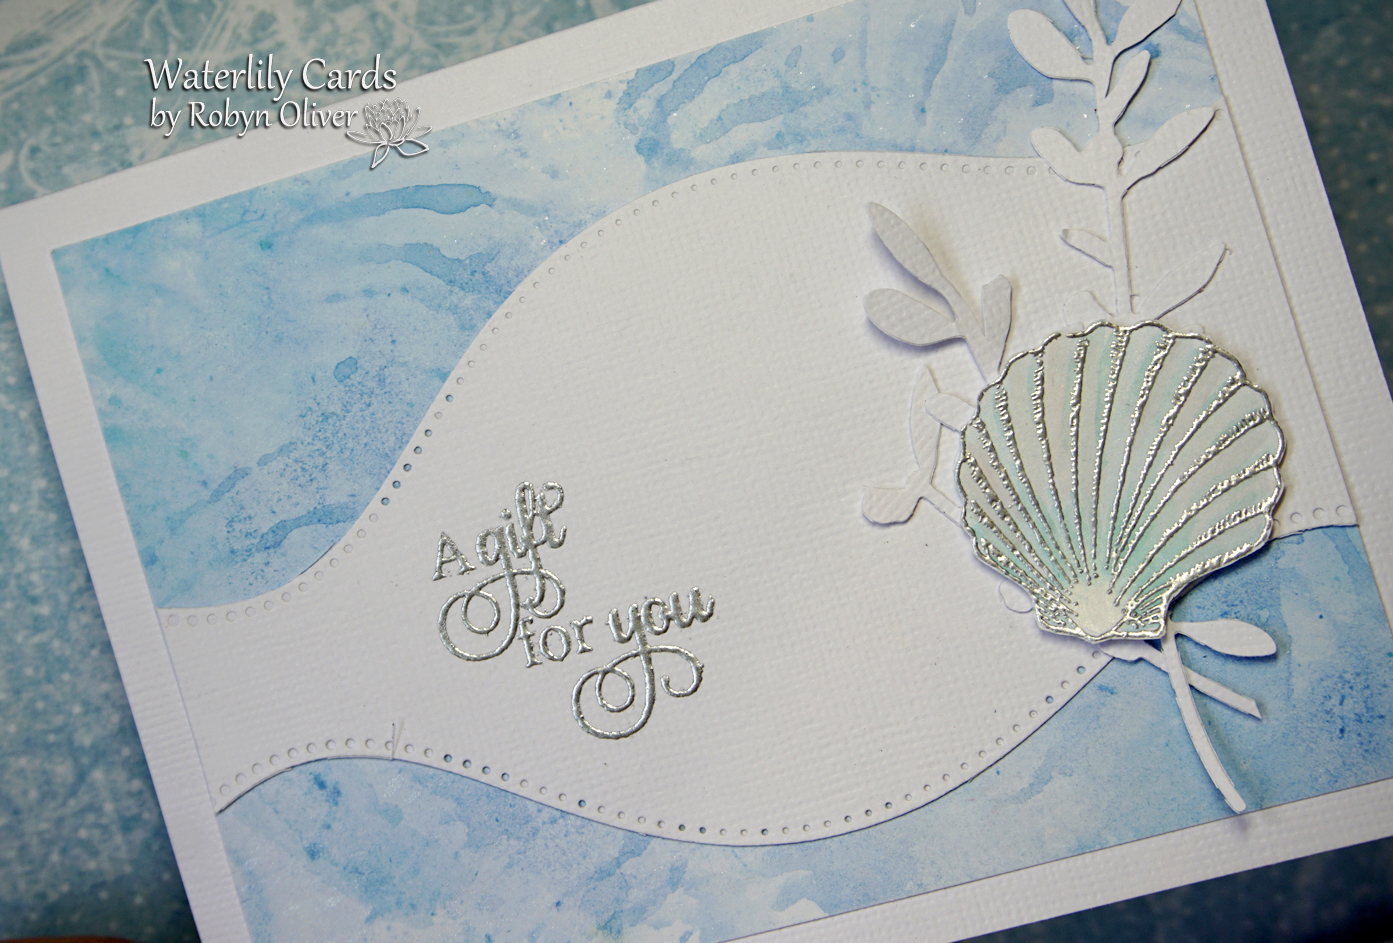
COOL COLOURS

Here's a sampling of cool colors


For this card I chose a poppy - part of a large stamp, carefully inked the area I wanted in Versamark, stamped and clear embossed it - then watercoloured it with "cool coloured" Distress Inks and a tiny amount of Brushos. Then I fussy cut the image, die cut a stitched frame using a large die with tails but part cut it, turned it and re-positioned the die to make it smaller...I often do this... did it also with the stamped and silver embossed sentiment.  To give the card some dimension I dry embossed the background panel and then arranged the elements with foam tape...and to finish added a few silver gems.


The CAS Watercolour challenge closes on the 24th, we'd love to see your cards in the gallery.
Thanks for stopping by - have a happy day


Card Recipe:
Stamps: PSX - Poppies, Clear Impressions - Celebrate set (sentiment)
Dies:  Poppy Crafts - Stitched Flag Tails
Inks: Versamark, Distress Inks - Faded Jeans, Stormy Sky,  Brushos - Violet, Cobalt blue, Lime green
Other:  Kaisercraft EF - Fern Leaf, silver gems

Monday, 13 January 2020

Wishes for You

Well this is definitely my favourite stamp at the moment - I love the poppies and how it inks and stamps... so be warned there are other cards in my WIP pile, coming soon - it's actually not mine it's my friend Vikki's but fingers crossed there will be one coming to my desk soon.

I stamped the image in antique linen DI on white card and then coloured it with my trusty old colouring pencils and stamped on my sentiment (two different stamps).
    
This is how it looks before the pencils - it's not the one I used but you can see I stamped more than one.

To finish the card I die cut a stitched rectangle and then trimmed the panel to fit inside and then used foam sheet to mount it and then attached to a cream card base.

Here is a close up....

I am playing along with Penny Black & More January challenge - Make It Feminine   .....   AND  .... Yes, Virginia January - Show & Share    ....   AND   ....    Stamping Sensations January challenge - Favourite Stamps.
Thanks for stopping by my blog - Have a Happy Day


Please do grab our logo to display on your own blog  
Please grab our logo Winners badge

Card Recipe
Stamps: Penny Black - Spontaneous Joy, Power Poppy - Strong & Beautiful (large sentiment), Avery Elle - Layered Rose (small sentiment)
Dies: Poppy Craft - stitched nesting rectangles.
Inks: Distress Ink - Antique Linen, Versafine - black
Other: Coloured Pencils

Friday, 10 January 2020

Pastel Happy Birthday

Hi there and how was your week, hope you found some time for cardmaking or craft..... I've been at my desk making a couple of cards and then watching tennis on TV and making crochet string bags.


For a change my card today doesn't feature flowers.... I did some Partial Die-Cutting for the CAS Mix Up January challenge.   Chose a largish 'Happy Birthday' die and part cut it onto a white card panel, then used a circle die to cut up to the cut lines of the sentiment.  I decided then to use the larger circle die and create a frame and so it would fit on the card trimmed down the left side.  I die cut the last few letters of the sentiment again to put in place where the sentiment finished on the circle frame.  Then I found this pastel background in my stash - I had used Versamark on a stencil and stamped that onto white card and then sponged over with Distress Inks - the Versamark picks up the colour in a darker shade displaying the stencil pattern... this was then spritzed with Perfect Pearls. I die cut a circle from this panel to fit behind the frame and to highlight the die cut sentiment.  Then I stamped the small sentiment in inks similar to the pastel background and use coloured pencils to colour in the outline word. To finish I assembled the element on a white card panel and attached to a white card then used a punch and cut small circles from the background scraps, glued these in place and added a touch of clear Crystal drops.


Thanks for stopping by - have a happy day


CAS Mix Up elements - stamping, partial die cutting, monoprint stencil, sponging, die cuts, punches

Card Recipe
Stamps:  Power Poppy - Strong  Beautiful (sentiment)
Dies:  Spellbinders Nesting Circles, Curly Sue - Happy Birthday
Inks:  Versamark, Distress Inks - not sure, Kaleidacolor- Birthstone
Other:  Kaisercraft Template (stencil) Damask Quarters, Perfect Pearls Mist, Nuvo Crystal Drops - clear, Derwent coloured pencils, circle punch

Thursday, 9 January 2020

A Rose Water-coloured with Brushos


One has got to love the layers of a rose as the bud opens and the lovely scent that wafts at you as you admire them.

So I made a floral card today - my rose was stamped in Versamark and embossed  with white pearl EP and then I used Brushos to watercolour the image.  To frame my image I die cut a scalloped circle and then used a larger circle die to cut a round frame.  I was initially going to use a double stitched circle to frame this but was happy so then I added my framed flower to it and that left a single stitched line around the frame... I mounted this with foam sheet to a square white card and to finish added a stamped sentiment, die cut with a stitched rectangle die. 


Here is a close up...

To begin with I was ummming and arhhing over the watercolouring of the first card, and so had another go with a gold embossed rose - watercoloured with the same Brusho colours. I die cut a double stitched circle frame in a white card panel, trimmed to fit a blue card....stamped the sentiment in black and assembled the card. To finish I added a few clear crystal drops.


Here's a close up of the second card

I am playing along with the Watercooler Wednesday WWC253 challenge - Karen's - Anything GOes with a Feminine Twist.    Thanks for stopping by - have a happy day


Card Recipe
Stamps:  Hero Arts - Rose, Happy Little Stampers - Dandelion Wishes, Kinetic Creations - sentiment
Dies:  Spellbinders - Large scalloped circle nesting dies, Spellbinders - circle nesting dies, Poppy Crafts - Double stitched circle nesting dies
Inks:  Versamark, Versafine - black
Other:  Brushos - lemon, lime green, cobalt blue, violet,  WOW white pearl EP, Little Birdie gold EP, Nuvo clear Crystal Drops

Monday, 6 January 2020

Birthday Wishes

Following on from my cards on Friday, I stamped more of these azaleas using the layering stamps and co-orrdinating dies... they do make it easy.  So I decided to make a card for


I used a white folded card and a Decorative die and cut a partial flap for the front of the card, scoring and folding at the edge of the cut... which looked great but left the card unable to stand - so I cut another panel same size as the back and adhered it to the top with a narrow strip of tape.


Then sourced some patterned paper in yellows to match the flowers - one panel for the background and one cut with the next size down Decorative die on which I stamped the sentiment before attaching to the card front with foam sheet.  I was a bit bland so I cut a narrow strip of the background PP and placed it along the bottom edge. To finish I arranged the die cut flowers  and leaves and attached with foam tape and added some white crystal drops.


Thanks for stopping by - have a happy day


Card Recipe:
Stamps:  Altenew - Springtime Azalea,  Clear Impressions - Tropical Delights, sentiment
Dies: Kaisercraft - Decorative Nesting Dies, Altenew - co-ordinating dies, Springtime Azalea.
Inks:  Distress Inks - Rusty Hinge, Wild Honey, Scattered Straw, Forest Moss,, Peeled Paint, Shabby Shutters, Versafine - black
Other:patterned paper, Nuvo Crystal Drop-white, foam tape

Friday, 3 January 2020

Three from One

Today I've had a fun time making a couple of cards that I spied on Pinterest
Floating Die Cut Frame cards created by Jennifer McGuire, 


Got to love it when you can make three from one --
Followed Jennifer's guidelines and then used a die to cut the center rectangle to make this first floral border card.. with the floating feature, and stamped the sentiment in black on a white card and mounted the frame to this and finished off with a scattering of clear gems in the spaces.


Then with the center cutout I made the second card, attached to a white card layer and then attached to a white card with foam sheet to add more interest.  To finish I added a stamped sentiment strip and a few red pearls in the spaces.


The last card is made from the flower pieces cut from the outer edge... to a white card panel I added a strip of gold washi tape and then a very thin strip of black card. Then lined up the cutoffs along the top and lucky for me I had made an extra flower and leaves so attached these with foam tape.  To finish I attached the panel to a red card, added some gold glitter spots and sentiment - die cut from gold washi tape on white card and a shadow layer of black.


I really enjoyed making these cards and the floating effect with the die cuts on foam tape, is really cool.  I am playing along with Seize the Birthday #180 challenge - Layer It.
Thanks for stopping by and have a Happy Day


Card Recipe
Stamps: Altnew - Sprintime Azalea, Chocolate Baroque - Amazing Birthday, Happy Little Stampers - H B'day
Dies:  Altenew - Co-ordinating dies - Sprintime Azalea, Elizabeth Craft - Happy Birthday, Spellbinders - square nesting dies
Inks:  Distress Inks - Aged Mahogany, Barn Door, Tattered Rose, Forest Moss, Peeled Paint, Shabby Shutters, Versafine - Black
Other: Gold Washi tape, gems, pearls, gold glitter glue

CAS Watercolour January challenge


Well I hope you've had a wonderful Christmas and start to 2020....
and now all ready to go with new challenges
CAS Watercolour team member Bonnie is hosting a
COOL COLOURS THEME
for January, so let's start off the year with something cool.


For my CAS card I used my old watercolour pencils - the wood has split and the leads keep breaking, but there was enough for me to scribble lots of colour onto my plastic worksheet - started with some blues and then spritzed with water and smooched my white card in the puddle, then I added some purple, lastly I pulled out a piece of that stretchy white foam latticey stuff they put around bottles to protect them and this added some depth and dimension to the flat panel I had made.  I thought it looked a bit like water so added a large die cut wavy section to the middle, stamped and silver embossed the sentiment and finished off with a fussy cut, stamped silver embossed sea shell, lightly painted with watercolour pencils and added some die cut 'water weeds'  behind it.


This is my first card as a member of the CAS Watercolour team and I'd love for you to pop over to the CAS Watercolour blog and check out the awesome cards from the other DT ladies and also our Guest Designer - Chrissie.
Thanks for stopping by and have a happy day

Card Recipe
Stamps:  Print Blocks - shell, Inspired by Stamping - sentiment
Ink:  Versamark
Dies:  Spellbinders - curved border, Sizzix - spring greenery
Others:  Watercolour pencils, Crafty Kids - silver EP

Wednesday, 1 January 2020

Welcome to a new year and a new decade.... Happy New Year

Hello fellow crafters, 
just here to wish you all the very best in health and happiness
and lots of creative timethis coming year -- whatever you like to turn your hand to.
Looking for to some more challenges, new techniques 
and maybe not too many new products - my new years resolution
is to get into my stash and make good use of it.

Now I'd like to share with you this gorgeous artwork our daughter made for us
this Christmas... she's a nurse, a busy mum and I was thrilled to see her put her hand to 
some craftwork.... I love it, it's very special.
Enjoy life, it passes us by soooo quickly