Showing posts with label sending smiles. Show all posts

Monday, 27 April 2026

A floral card featuring the 'Bleaching' technique...

 hhmmmm, why does one dither when after you've sat down and created a card, it wasn't that tricky.

This month (which is nearly finished) over at Group of Cardmakers they were inspiring us with a Bleaching Technique...  I used water to 'bleach' away the Distress Oxide inks.  I actually blended the background panel days ago and then for whatever reason didn't make myself sit down and finish the card -  I silver embossed the floral image and then watercoloured the image. The water didn't bleach away much of the background blues but enough so the Distress Inks did watercolour the area.  Finished with a stamped silver embossed sentiment that I popped up with foam dots. .... and I'm very happy with the result. 


Thanks for stopping by my blog,

have a Wonderful day

Cheers Robyn

Saturday, 29 November 2025

Guest Designer for Group of Cardmakers.

I'm always up for a challenge and 

Group of Cardmakers have some fabulous techniques to stir up your mojo - this month as their Guest Designer I've been challenged with --

  "Stenciling with Mica Powders".


For my first card I used this large stencil - Tumbling Leaves by Simon Says.
First I blended a range of Distress Inks colours through the stencil, then applied some Embossing Ink and then sprinkled on Magical Micas in matching colours (blue, b=green, yellow) - a fine spritz of water helps set them.  Clean your stencil between applications and it helps to have it in place when your add the pigment powder.  Finished with a stamped sentiment


Wanted to try something a little different with the stencil instead of using it as a background... so I die cut a circle and used this to create a bauble - blending Distress Oxide ink (seedless preserves), then covering the bauble with the die cut circle to add some depth with blue Distress Ink (stormy sky).  Place the negative die cut again over the bauble and used a flourish stencil and then blended the same colour in Distress Ink for my flourish, followed by Embossing Ink and the Pearl Gold Powdered Pigment (Paper Mill) - this doesn't work as well nor with the water spritzing to set it.  Stamped on my bauble hanger (masked off this from an ornament stamp) and gold embossed the sentiment.


I've had loads of fun with some long forgotten products in my stash - thanks to Loll and her GoC team - pop over to the blog and check their cards too.
Thanks for stopping by my blog.... have a wonderful day,
Cheers Robyn
Thursday, 23 October 2025

Creative ways with Inlaid Diecutting

A couple more cards I put together ---  while I join in with the

  Group of Cardmarkers technique this month - Inlaid Diecutting....  

and as I try to do each week - join Darnell with her 

IDEAS prompt - this week 'A' = Anything Goes.

 ---- one with one my more intricate dies 
I die cut the piece in black card so it sort of looks like a stained glass window... even put a blue cloudy sky as the background and filled in all the flower and butterflies with the pieces die cut from metallic card.

I really liked what Loll at GofCM did with one of her cards and so I die cut the gum blossom out of a marbly piece and then die cut the leaves from green and flowers from pink and inset them into the patterned paper.


Thanks for stopping by my blog... have a wonderful day, Cheers Robyn

Monday, 23 May 2022

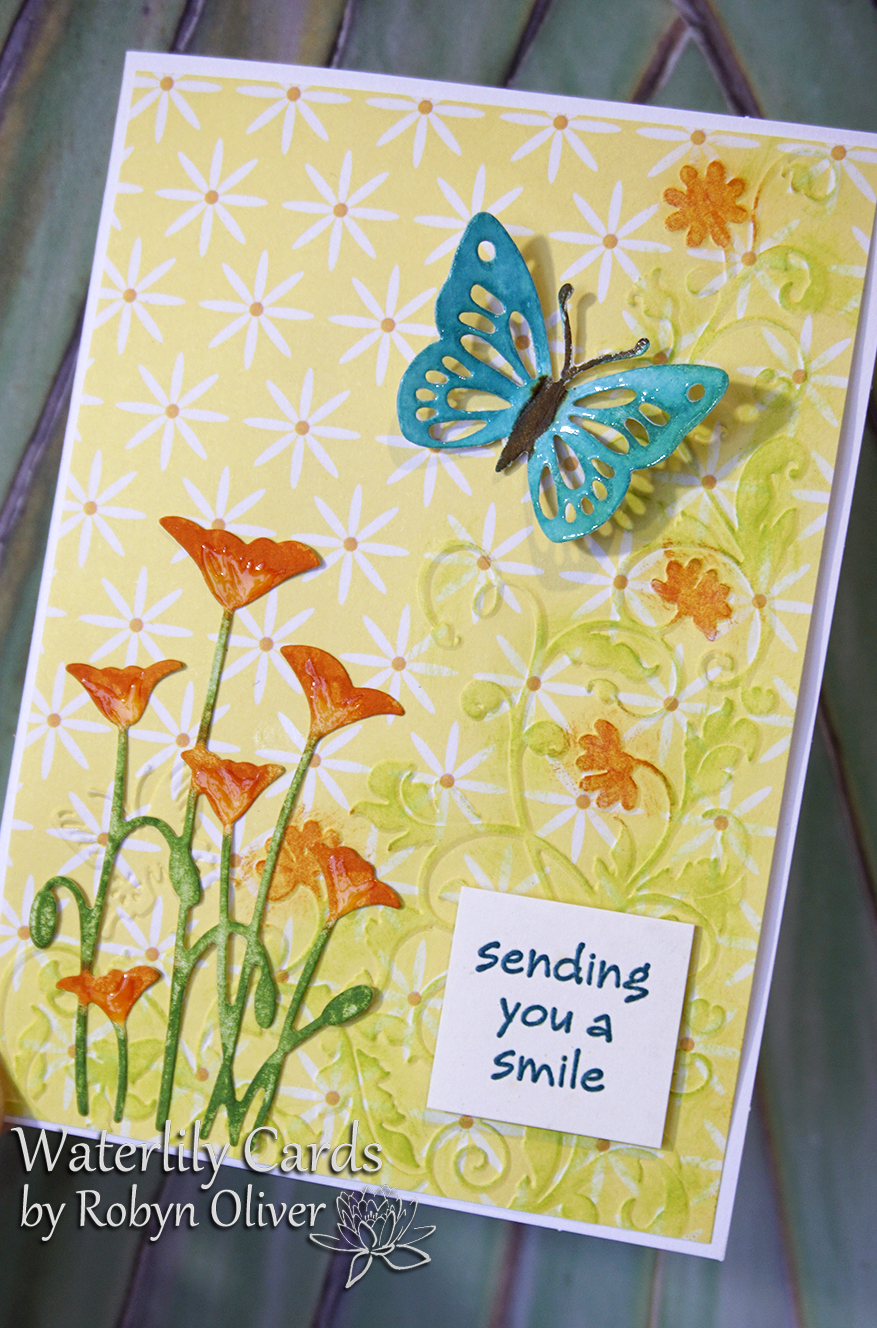
Sending You a Smile

Hello ...   hope you're keeping well and enjoying your day


Used a corner design embossing folder (Australian Simply Cards freebie) to emboss a panel of patterned paper and highlighted the raised areas with Distress Ink - twisted citron and spiced marmalade.
Die cut a floral piece and butterfly (unknown) and inked these with DI too - mown lawn, spiced marmalade and peacock feathers and attached to card.  Finish with a stamped sentiment from my stash


I am playing along with Can You Handle the Pressure - with a Twist of Flowers.   Thanks for stopping by my blog.... have a Wonderful Day,   Cheers Robyn

Monday, 12 April 2021

Sending a Smile

This month at CAS Mix Up,  Linda is challenging us to use our patterned papers with Paper Piecing

  • I selected this daffodil stamp and three pieced of patterned paper to suit
  • Stamped the image on each in black and fussy cut the parts and attached the small pieces in place
  • On cream card I stamped the image again twice in grey and as it was too dark I shaded over it with a white Derwent Pastel pencil and lightly coloured the parts with pencils.  Added some depth to the image with coloured pencils
  • Then stamped and gold embossed the sentiment
  • Assembled all the elements on a mustard yellow card and added some white gel pen to the stamen.


I am playing along with CAS Mix Up April challenge - Paper Piecing ---my elements, stamping, paper piecing, heat embossing
Thanks for visiting  --   have a Wonderful Creative day,  cheers

Card Recipe 
Stamps:  Hero Arts -Daffodil Portrait, Chocolate Baroque - Amazing Birthday
Dies: 
Inks: Versamark, Versafine - black, smokey grey
Other:  gold embossing powder, coloured pencils, white gel pen, Derwent Pastel pencil - titanium white

Saturday, 11 July 2020

Sending a Smile Your Way


Here we have the granddaughters having some beach cricket fun with mum and pa - this week we took a break during the school holidays for a few days and even though the weather wasn't brilliant the girls had a wonderful time.
 

My card today is showcasing the use of a stencil.... on our return from our little holiday there was a lovely surprise from a special friend in the post... this fabulous leafy stencil ... I used a brush to blend ink over the stencil along one side of white card and then used a white gel pen to trace freehand around the leaves and then added rows of dots.  I stamped the sentiment, attached the panel to a matching card and to finish added a scattering of white Nuro Crystal drops.


I am playing along with CAS Mix Up July challenge - Stencil Tracing
Thanks for stopping by my blog   ---    have a Happy Day and stay safe


Card Recipe  
Stamps: Chocolate Baroque - Amazing Birthday..
Dies: 
Inks: Distress Oxide - Carved pumpkin, Versafine - black
Other:  Simon Says Stencil - Tumbling leaves, Nuvo Crystal Drops - white, white gel pen

Wednesday, 19 February 2020

Sending Smiles


I stamped the image in grey ink on a folded card and used Distress Inks to colour it, then stamped and gold embossed the sentiment.... quick and easy
My optional twist - older supplies.... is the gold embossing - although the powder has been replaced over the years, it was the magic of the heat embossing that first captured my creative streak and has had me creating cards for many years.

Thanks for stopping by my blog  ---  have a Happy Day

 
Card Recipe 
Stamps: Power Poppy - Azalea, Hero Arts - Take good care greetings set
Dies: 
Inks: Versafine - Smokey Grey, Versamark, Distress Inks - Spun Sugar, Worn Lipstick, Shabby Shutters, Peeled Paint
Other: Gold embossing powder, light blue coloured pencils

Sunday, 6 October 2019

Sending Smiles


Firstly a big CONGRATS to the CAS Watercolour team... celebrating their 3rd Birthday.... there are prizes too - and I'm sure they'd love to see lots of CAS cards this month.
Loll is this months host and the theme is MAPLE LEAF.


On the front panel I used a texture border stamp (Kaiserkraft) with Distress Inks.. antique linen, spiced marmalade, crushed olive and candied apple - over stamping  with a final splattering of Versamark and gold embossing, then I added a strip of gold washi tape and fine strip of red card.  For my Maple Leaf I inked an old wood mounted solid stamp (PSX)  with Distress Inks in mustard seed, spiced marmalade and candied apple lightly spritzed with water and stamped on white card...then fussy cut it out.  I stamped and gold embossed the sentiment and to finish the card, added a strip of gold washi tape to the bottom edge and used foam tape to attached the leaf and sentiment. 
Thanks for visiting, I really appreciate it, happy watercolouring

 Please grab our logo

Monday, 8 July 2019

Sending You a Smile


Oh I have had some fun with Alcohol Inks on Metallic card and the Alcohol Lift technique....see here
.... and as there were different coloured Metallic card in the pack I chose pink for this card and used red and blue AIs.... I liked that the two mixed and I got some purple.  Then I used a floral stencil and a wadded dry baby wipe with a drop or two of blending solution to dab away the ink, revealing the pink underneath...don't dab too much or you'll take the pink and leave silver.
I trimmed the panel and attached it to a white card along with a white strip with my stamped sentiment.  To finish I added a die cut floral from the same pink metallic card..
It's very shiny and card to photograph!!!


Thanks for visiting, I really appreciate it, happy card making.